IGV (Integrative Genomics Viewer) is a powerful and versatile tool for visualizing genomic data, enabling researchers to explore genomic variations effectively. Its graphical interface makes it very user-friendly on Windows systems. However, when batch processing large-scale bioinformatics data, Linux often provides a more suitable environment. Unfortunately, using IGV on Linux can be less straightforward. This article documents the detailed procedures for running and utilizing IGV on Linux systems.
Different versions of IGV require specific versions of Java. Therefore, you should first decide which IGV version you plan to install and then set up the corresponding Java version.
You can download the IGV installation package from the IGV Download page. Since we will be running IGV on a Linux system, the recommended option is Command line IGV and igvtools for all platforms (Separate Java 17 required). Download it to your working directory on the server. After extracting the package, IGV can be launched directly using the igv.sh script included in the installation directory.
# Download the IGV package
wget https://data.broadinstitute.org/igv/projects/downloads/2.18/IGV_2.18.0.zip
# Extract the IGV package
unzip IGV_2.18.0.zip
# Run IGV (requires the specified Java version to be installed correctly)
cd IGV_2.18.0
igv.sh
IGV requires a specific version of Java to run properly. In addition, generating genomic visualization figures with IGV involves invoking a graphical interface (X Window server). On Linux, Xvfb (X Virtual Frame Buffer) can be used to simulate an X Window server for IGV. Finally, since the figures exported directly from IGV do not fully meet my requirements, I also installed ImageMagick to crop and adjust the exported images.
Because IGV requires a specific Java version, managing it directly on a shared Linux environment can be inconvenient. To avoid version conflicts, this guide uses Singularity to create an isolated Linux container for IGV. Another benefit is easier migration: once the Linux container is copied to another Linux system with Singularity installed, IGV can be run directly there.
Singularity is a containerization technology developed by Lawrence Berkeley National Laboratory for large-scale, multi-node HPC and deep learning workloads. It is lightweight, quick to deploy, easy to migrate, and supports conversion from Docker image format to Singularity image format.
Using Singularity is optional. The method described here is simply convenient for managing a clean runtime environment. For Singularity installation, see Singularity Installation and Usage Tutorial: Containerization Guide for HPC Environments.
1. Download a base Singularity image
First, we need a Linux base image. You can download an official Linux base image from the Singularity library page, or pull one directly with the command below:
# Pull a base Ubuntu container from Singularity
[root@comput1 ~/example]$ singularity pull library://library/default/ubuntu
INFO:    Downloading library image
28.44 MiB / 28.44 MiB [================================] 100.00% 2.66 MiB/s 10s
WARNING: unable to verify container: ubuntu_latest.sif
WARNING: Skipping container verification

[root@comput1 ~/example]$ ls
ubuntu_latest.sif
2. Create a Singularity sandbox
The container pulled by Singularity is a read-only SIF file. To install software inside it, convert it into a writable sandbox directory named IGV_env:
# Convert/build the SIF file or sandbox
[root@comput1 ~/example]$ singularity build --sandbox IGV_env/ ubuntu_latest.sif
INFO:    Starting build...
INFO:    Creating sandbox directory...
INFO:    Build complete: IGV_env/

[root@comput1 ~/example]$ ls
IGV_env  ubuntu_latest.sif
3. Configure the environment inside the sandbox
Now we can enter the sandbox and install the required software inside it:
# Enter the sandbox in writable mode
[root@comput1 ~/example]$ singularity shell --writable IGV_env/
Singularity>
# Update apt
Singularity> apt-get update
# Install Java 17 (the Java version required by this IGV release)
Singularity> apt install -y openjdk-17-jdk
# Install Xvfb
Singularity> apt-get install -y xvfb
# Install ImageMagick
Singularity> apt-get install -y imagemagick
# Exit the sandbox
Singularity> exit
4. Package the sandbox into a new read-only SIF file
After the environment is configured, the sandbox can be repackaged into a read-only SIF file, which is safer and easier to migrate:
# Convert/build the SIF file or sandbox
[root@comput1 ~/example]$ singularity build IGV_env.sif IGV_env/
INFO:    Starting build...
INFO:    Creating SIF file...
INFO:    Build complete: IGV_env.sif
[root@comput1 ~/example]$ ls
IGV_env  IGV_env.sif  ubuntu_latest.sif
If you have successfully configured a Singularity container using the steps above, you can jump directly to the section on generating genomic visualization plots. If you encounter problems while installing software inside Singularity, refer to the following subsections. If you do not plan to use Singularity, you need to install the required IGV software directly on your Linux system using the following subsections.
1. Install Java via package manager
IGV depends on a specific Java version. You need to install the Java version that matches your IGV release. You can install Java on Linux with the following commands:
apt-get update
# Check Java versions available through apt
apt search openjdk | grep -E 'openjdk-.*-jdk/'
# This article uses Java 17
apt install -y openjdk-17-jdk
# Check the Java version
java --version
2. Install Java manually
# Download the Java package
wget https://download.oracle.com/java/17/latest/jdk-17_linux-x64_bin.tar.gz
# Create an installation path
mkdir /etc/java-17-openjdk/
# Extract the Java package to the installation path
tar -xvf jdk-17_linux-x64_bin.tar.gz -C /etc/java-17-openjdk/

# Add Java to temporary environment variables
export JAVA_HOME=/etc/java-17-openjdk/jdk-17.0.12/
export PATH=$PATH:$JAVA_HOME/bin
IGV requires a graphical display environment to generate genome visualization plots, but Linux servers typically do not provide a graphical interface by default. In this case, instead of installing a full desktop environment, we usually use Xvfb to create a virtual graphical environment for IGV.
Xvfb (X Virtual Frame Buffer) is a virtual X Window server that can run X Window applications without physical graphics hardware or an interactive desktop. It simulates a complete X Window system, including display and input devices, while processing everything in memory without a monitor or keyboard. This makes testing and debugging GUI applications much easier on Linux servers.
Install Xvfb with:
# Install Xvfb
apt-get install -y Xvfb
# Run Xvfb (Ctrl+C to stop the service)
Xvfb
In practical use, we can call IGV through the xvfb-run shell script provided by Xvfb. xvfb-run automatically starts and stops Xvfb and sets the DISPLAY environment variable correctly. You only need to prefix the command that requires a graphical interface with xvfb-run:
# Use xvfb-run to start software that requires a graphical display
xvfb-run -a --server-args="-screen 0 1280x800x24 -nolisten tcp" igv.sh --batch Batch_scripts_example.txt
Either because I have not fully figured out IGV yet, or because IGV itself has some bugs, the visualization images produced by IGV did not fully meet my requirements. Therefore, ImageMagick is installed here to crop IGV-generated visualization images to some extent.
ImageMagick is a powerful image processing suite that can create, edit, combine, and convert images. It supports more than 200 image formats and provides rich features such as resizing, rotation, cropping, watermarking, and effects. ImageMagick also supports batch processing and can be called from the command line or programming interfaces. It is open source and runs on multiple operating systems, including Windows, macOS, and Linux.
Install ImageMagick with:
# Install ImageMagick
apt-get install -y imagemagick
# Crop image (-crop uses width x height + X offset + Y offset; top-left is 0,0)
convert example.raw.png -crop 968x485+167+0 example.png
Because of domestic network conditions, installing the above software with apt may fail. In that case, you can try replacing the apt source with a domestic mirror:
This method does not apply to Java, because domestic mirrors provide too few Java versions. For Java, try manual installation instead. If the other two software packages fail to install, this method may help.
# Back up the sources list
cp /etc/apt/sources.list /etc/apt/sources.list.bak

# Switch mirror source; choose one of the following three
## USTC mirror
echo '
# Source repositories are commented out by default; uncomment them if needed
deb https://mirrors.ustc.edu.cn/ubuntu/ focal main restricted universe multiverse
# deb-src https://mirrors.ustc.edu.cn/ubuntu/ focal main restricted universe multiverse
deb https://mirrors.ustc.edu.cn/ubuntu/ focal-security main restricted universe multiverse
# deb-src https://mirrors.ustc.edu.cn/ubuntu/ focal-security main restricted universe multiverse
deb https://mirrors.ustc.edu.cn/ubuntu/ focal-updates main restricted universe multiverse
# deb-src https://mirrors.ustc.edu.cn/ubuntu/ focal-updates main restricted universe multiverse
deb https://mirrors.ustc.edu.cn/ubuntu/ focal-backports main restricted universe multiverse
# deb-src https://mirrors.ustc.edu.cn/ubuntu/ focal-backports main restricted universe multiverse
# Pre-release repository; not recommended
# deb https://mirrors.ustc.edu.cn/ubuntu/ focal-proposed main restricted universe multiverse
# deb-src https://mirrors.ustc.edu.cn/ubuntu/ focal-proposed main restricted universe multivers
' > /etc/apt/sources.list
## Update sources
apt-get update

## Aliyun mirror
echo '
deb http://mirrors.aliyun.com/ubuntu/ xenial main
# deb-src http://mirrors.aliyun.com/ubuntu/ xenial main
deb http://mirrors.aliyun.com/ubuntu/ xenial-updates main
# deb-src http://mirrors.aliyun.com/ubuntu/ xenial-updates main
deb http://mirrors.aliyun.com/ubuntu/ xenial universe
# deb-src http://mirrors.aliyun.com/ubuntu/ xenial universe
deb http://mirrors.aliyun.com/ubuntu/ xenial-updates universe
# deb-src http://mirrors.aliyun.com/ubuntu/ xenial-updates universe
deb http://mirrors.aliyun.com/ubuntu/ xenial-security main
# deb-src http://mirrors.aliyun.com/ubuntu/ xenial-security main
deb http://mirrors.aliyun.com/ubuntu/ xenial-security universe
# deb-src http://mirrors.aliyun.com/ubuntu/ xenial-security universe
' > /etc/apt/sources.list
## Update sources
apt-get update

## Tsinghua mirror
echo '
# Source mirrors are commented out by default to speed up apt update; uncomment them if needed
deb https://mirrors.tuna.tsinghua.edu.cn/ubuntu/ xenial main restricted universe multiverse
# deb-src https://mirrors.tuna.tsinghua.edu.cn/ubuntu/ xenial main restricted universe multiverse
deb https://mirrors.tuna.tsinghua.edu.cn/ubuntu/ xenial-updates main restricted universe multiverse
# deb-src https://mirrors.tuna.tsinghua.edu.cn/ubuntu/ xenial-updates main restricted universe multiverse
deb https://mirrors.tuna.tsinghua.edu.cn/ubuntu/ xenial-backports main restricted universe multiverse
# deb-src https://mirrors.tuna.tsinghua.edu.cn/ubuntu/ xenial-backports main restricted universe multiverse
deb https://mirrors.tuna.tsinghua.edu.cn/ubuntu/ xenial-security main restricted universe multiverse
# deb-src https://mirrors.tuna.tsinghua.edu.cn/ubuntu/ xenial-security main restricted universe multiverse
' > /etc/apt/sources.list
## Update sources
apt-get update
After switching the source, try installing the required software with apt again.
On Linux, generating genomic visualization plots with IGV is actually done through IGV’s run batch script function. If you have used IGV on Windows, you can see that Batch Script simulates the process of manually generating genome visualization plots through the graphical interface. Each user action is simplified into a command statement. These command statements are combined into one Batch Script file and then loaded by IGV, which executes them in sequence.
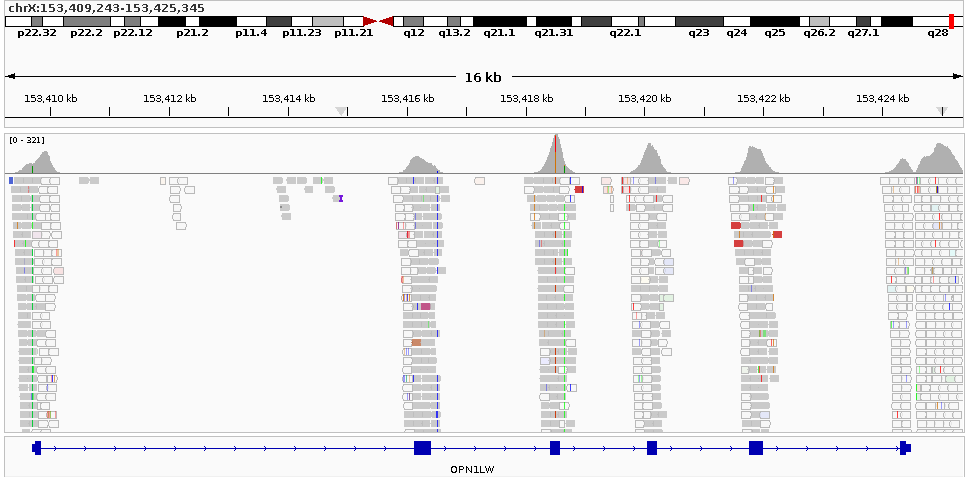
The following Batch Script file can be used to generate a genomic visualization plot for the OPN1LW region:
genome hg19
load ./testSample.deduped.bam name=testSample
goto chrX:153,409,243-153,425,345
sort position
collapse
maxPanelHeight 300
preference NAME_PANEL_WIDTH 0
snapshotDirectory ./mySnapshotDirectory
snapshot testSample.OPN1LW.raw.png
exit
Here, IGV will automatically download and load the hg19 reference genome. In most cases, however, storing the reference genome locally on the server is a more stable choice. We can save the reference genome files automatically downloaded by IGV to the local server, and then use a .genome file to tell IGV how to load the local reference genome files.
When IGV automatically downloads the hg19 reference genome, it provides a hyperlink to a .json file. You can download this file with wget; it contains hyperlinks to the reference genome files required by hg19. These links can be used to download the genome files locally.
I have not yet found a way to create a .genome file on Linux, so this step is done on Windows. First install the Windows version of IGV by downloading and installing IGV for Windows (Java included) from the IGV Download page. Then transfer the reference genome information downloaded on the local server to Windows. The genome sequence file is usually large, so it can be skipped here because we only need to create the .genome file.
To load a local .genome file, we need to modify the Batch Script file. Note that ncbiRefSeq.txt.gz needs to be loaded separately. This file contains the gene information shown at the bottom of the genome visualization. Since I have not figured out which Gene file format is required when creating the .genome file, I finally added the gene file manually in this way:
genome ./genome/hg19/hg19.genome
load ./genome/hg19/ncbiRefSeq.txt.gz name=Gene
load ./testSample.deduped.bam name=testSample
goto chrX:153,409,243-153,425,345
sort position
collapse
maxPanelHeight 300
preference NAME_PANEL_WIDTH 0
snapshotDirectory ./mySnapshotDirectory
snapshot testSample.OPN1LW.raw.png
exit
You can create a shell script (run.sh) to facilitate running IGV with the Singularity container created earlier:
# If Java was installed manually, uncomment the following lines to set temporary environment variables
# export JAVA_HOME=/etc/java-17-openjdk/jdk-17.0.12/
# export PATH=$PATH:$JAVA_HOME/bin

# Run IGV with Xvfb. IGV generates the genomic visualization according to the commands in the batch file
xvfb-run -a --server-args="-screen 0 2560x720x24 -nolisten tcp" /root/shenh/singularity/IGV/IGV_2.18.0/igv.sh --batch ./Batch_script.txt
# Crop the genomic visualization image generated by IGV
convert ./mySnapshotDirectory/testSample.OPN1LW.raw.png -crop 968x485+167+0 ./mySnapshotDirectory/testSample.OPN1LW.png
In principle, the preference NAME_PANEL_WIDTH 0 command in the Batch Script file should remove the Name Panel on the left side of the visualization. However, for some reason, it does not take effect. Therefore, I used ImageMagick to crop the left panel manually.
Run the following commands to generate the genomic visualization plots:
# For users using Singularity
singularity exec IGV_env.sif sh run.sh
# For users not using Singularity
sh run.sh
1. When I moved the prepared IGV_env.sif file to the production server and ran it there, the following error kept appearing during execution:
(process:45461): dconf-CRITICAL **: 11:49:23.924: unable to create directory '/run/user/1019/dconf': Read-only file system. dconf will not work properly.At present, this error does not affect the final results. While trying to locate the cause, I found that the Xvfb service on the production server had already been started by the root user by default, while the local test server only starts Xvfb when testing IGV. I am not sure whether this difference caused the error above.
# On the production server, Xvfb was already running under administrator control
Singularity> Xvfb
(EE)
Fatal server error:
(EE) Server is already active for display 0
        If this server is no longer running, remove /tmp/.X0-lock
        and start again.
(EE)
Singularity> ls -l /tmp/.X0-lock
-r--r--r--. 1 root root 11 May 27 19:18 /tmp/.X0-lock